Weld verification
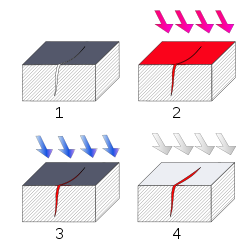
1. Section of material with a surface-breaking crack that is not visible to the naked eye.
2. Penetrant is applied to the surface.
3. Excess penetrant is removed.
4. Developer is applied, rendering the crack visible.
2. Penetrant is applied to the surface.
3. Excess penetrant is removed.
4. Developer is applied, rendering the crack visible.
Welds may be tested using NDT techniques such as industrial radiography or industrial CT scanning using X-rays or gamma rays, ultrasonic testing, liquid penetrant testing, magnetic particle inspection or via eddy current. In a proper weld, these tests would indicate a lack of cracks in the radiograph, show clear passage of sound through the weld and back, or indicate a clear surface without penetrant captured in cracks.
Welding techniques may also be actively monitored with acoustic emission techniques before production to design the best set of parameters to use to properly join two materials.[6] In the case of high stress or safety critical welds, weld monitoring will be employed to confirm the specified welding parameters (arc current, arc voltage, travel speed, heat input etc.) are being adhered to those stated in the welding procedure. This verifies the weld as correct to procedure prior to nondestructive evaluation and metallurgy tests.


No comments:
Post a Comment